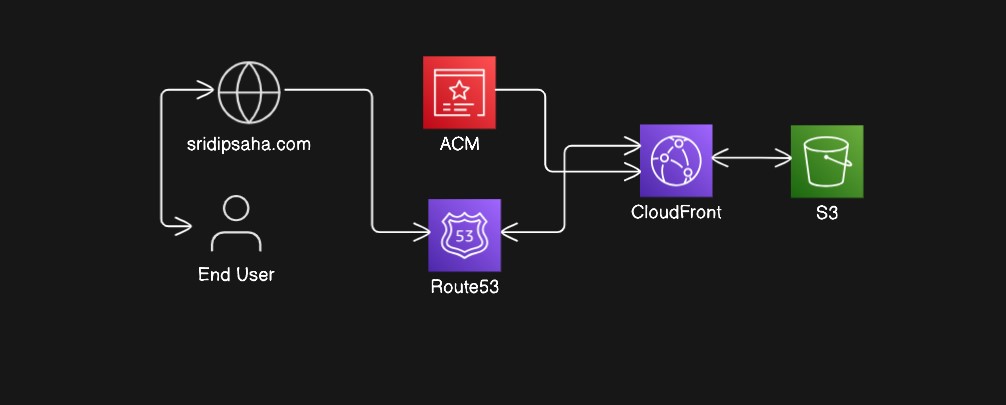
Welcome to my blog! I’m excited to share my journey of creating and hosting my portfolio website using Hugo, a static site generator, and AWS services like S3, Route 53, CloudFront, and ACM. This blog will walk you through the steps I took and provide insights into the process, ensuring you can replicate it for your own projects.
Why Hugo?
Hugo is a popular static site generator known for its speed and flexibility. Here are a few reasons why I chose Hugo:
- Speed: Hugo is incredibly fast, which is perfect for generating static websites quickly.
- Ease of Use: It has a straightforward setup and an extensive collection of themes.
- Customization: Hugo allows for great customization, making it ideal for a personalized portfolio.
Step-by-Step Guide to Building and Hosting the Website
1. Setting Up Hugo
First, I installed Hugo on my local machine. You can follow the official Hugo installation guide to get started.
Once installed, I created a new Hugo site:
hugo new site my-portfolio
cd my-portfolio
Next, I chose a theme and added it to my site. For instance, if you select the Ananke theme, you can add it like this:
git init
git submodule add https://github.com/theNewDynamic/gohugo-theme-ananke.git themes/ananke
echo 'theme = "ananke"' >> config.toml
Then, I created my content:
hugo new posts/welcome.md
I edited the welcome.md file with my content and customized the site configuration in config.toml.
2. Building the Static Site
To generate the static files, I ran:
hugo
This command created a public directory containing all the static files for my website.
3. Hosting on AWS S3
Creating an S3 Bucket I logged into the AWS Management Console and created an S3 bucket named sridipsaha.com. This bucket will host the static files.
Configuring the Bucket I enabled static website hosting in the S3 bucket settings and specified index.html as the default document.
Uploading Files Using the AWS CLI or directly from the S3 console, I uploaded the contents of the public directory to the bucket:
aws s3 sync public/ s3://sridipsaha.com/
4. Setting Up Route 53
Domain Registration I registered my domain, sridipsaha.com, using Route 53. If you already have a domain, you can transfer it to Route 53.
Configuring DNS I created an A record and a CNAME record in Route 53 to point my domain to the S3 bucket.
5. Securing with ACM and Distributing with CloudFront
Requesting an SSL Certificate In the AWS Certificate Manager (ACM), I requested a public certificate for sridipsaha.com and www.sridipsaha.com. After validating the domain ownership, I received the certificate.
Setting Up CloudFront I created a CloudFront distribution with the following settings:
Origin Domain Name: My S3 bucket (e.g., sridipsaha.com.s3.amazonaws.com). Alternate Domain Names (CNAMEs): sridipsaha.com and www.sridipsaha.com. SSL Certificate: The certificate from ACM. Configuring Distribution I configured CloudFront to use the SSL certificate and set the default root object to index.html.
6. Updating Content
To update my website with new content, I simply regenerated the static files with Hugo and uploaded them to the S3 bucket. I also invalidated the CloudFront cache to ensure changes were reflected immediately:
aws cloudfront create-invalidation --distribution-id YOUR_DISTRIBUTION_ID --paths "/*"
Conclusion Building and hosting a portfolio website with Hugo and AWS services was a rewarding experience. Hugo’s speed and flexibility, combined with AWS’s robust infrastructure, ensured my website is fast, secure, and scalable.
I hope this guide helps you in your journey to create your own portfolio or any static website. Feel free to reach out if you have any questions or need further assistance!
Happy coding!
